> For the complete documentation index, see [llms.txt](https://doc.orbeon.com/llms.txt). Markdown versions of documentation pages are available by appending `.md` to page URLs; this page is available as [Markdown](https://doc.orbeon.com/xforms/xforms-tutorial/bookcast/basics.md).
# The basic app
## Getting started
But first things first. Start by making a first functional page:
* The first thing to do is to create a new directory for your application. Orbeon Forms already come with the complete `xforms-bookcast` application, so instead let's decide on another name, for example `my-bookcast`. Create a directory with that name as `RESOURCES/apps/my-bookcast`. For convenience, we refer to that new directory as the `BOOKCAST` directory below.
* Create a `page-flow.xml` file under `BOOKCAST`:
```markup
```
This page flow is automatically called for any path that starts with `/orbeon/my-bookcast/`. Here, it matches on the exact path `/orbeon/my-bookcast/` and calls up the page view called `view.xhtml`.
* Create a skeleton for your `view.xhtml` under `BOOKCAST`:
```markup
XForms Bookcast
Hello!
```
This is a very basic XHTML document. It features a title in the `` and a "Hello!" message in the ``. It also declares a bunch of XML namespaces that you need later in the document.
Now go to:
```markup
http://localhost:8080/orbeon/my-bookcast/
```
You should see something like this:

*NOTE:*
*If you get lost at some point in this tutorial, feel free to look at the reference source files for the Bookcast application:*
* [view.xhtml](https://github.com/orbeon/orbeon-forms/blob/master/orbeon-war/src/main/webapp/WEB-INF/resources/apps/xforms-bookcast/view.xhtml)
* [page-flow.xml](https://github.com/orbeon/orbeon-forms/blob/master/orbeon-war/src/main/webapp/WEB-INF/resources/apps/xforms-bookcast/page-flow.xml)
## XForms model and instance
An XForms document that wants to do something really useful needs at least one model containing one instance. But first it is wise to decide how you would like to represent the information captured by your form. This is an example that shows a possible representation of the data of the Bookcast application (notes are borrowed from Wikipedia and are under the GNU Free Documentation License):
```markup
Don Quixote de la ManchaMiguel de Cervantes Saavedraes
http://en.wikipedia.org/wiki/Don_Quixote
5
The book tells the story of Alonso Quixano, a man who has read so many stories about
brave errant knights that, in a half-mad and confused state, he believes himself to be a
knight, re-names himself Don Quixote de la Mancha, and sets out to fight injustice in
the name of his beloved maiden Aldonsa, or as he knows her in his mind, Dulcinea del
Toboso.
Jacques le fataliste et son maîtreDenis Diderotfr
http://en.wikipedia.org/wiki/Jacques_le_fataliste_et_son_ma%C3%AEtre
5
Ce roman complexe et déconcertant — sans doute l'œuvre de Diderot la plus commentée —
puise pour partie son inspiration dans l'ouvrage de Laurence Sterne, Vie et opinions de
Tristram Shandy paru quelques années auparavant (1759-1763).
Childhood's EndArthur C. Clarkeen
http://en.wikipedia.org/wiki/Childhood%27s_End
5
Childhood's End deals with humanity's transformation and integration into an
interplanetary hive mind. The book also touches on the issues of the Occult, man's
inability to live in a utopian society, and cruelty to animals, as well as the cliché of
being the last man on Earth.
The Demon-Haunted WorldCarl Saganen
http://en.wikipedia.org/wiki/The_Demon-Haunted_World
5
Sagan states that when new ideas are offered for consideration, they should be tested
by means of skeptical thinking, and should stand up to rigorous questioning.
```
As you can see, the idea is to store the information about all the books in a single XML document. So under a top-level `` element, we put as many `` children elements as needed. You will see later how it is possible with XForms to add and remove children elements. For now, your initial instance declaration is empty and contains a single book, and you place it as usual within an `` element:
```markup
```
Notice the `id` attribute which allows other XForms constructs to refer to that particular instance.
Now do the following:
* Insert the model and instance under the `` element.
* Reload the page.
You should still see a blank page, because so far you haven't added any visual elements!
## First controls
Now it's time to add some visual controls to your page. Start with the following under the `` element:
```markup
Title Author
```
Reload the page. You should see something like this:
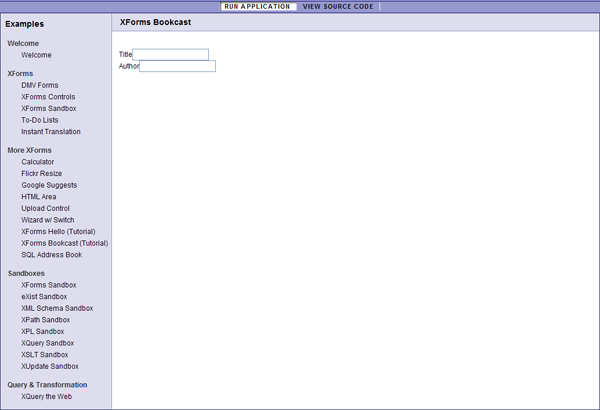
After having looked at the [Hello example](/xforms/xforms-tutorial/hello.md), this should be clear, with a little novelty: ``. This element allows grouping XForms controls together. The `ref="book"` element changes the current *evaluation context* for the nested controls, which means that they can use simpler XPath expressions: `ref="title"` instead of `ref="book/title"` and `ref="author"` instead of `ref="book/author"` (groups have other uses but you don't need to learn that now).
Another thing: all XForms controls require a nested `` element, as an effort to help accessibility. In some cases, you won't want an actual label to display next to the control: to achieve this, you can either hide the label with CSS, or use an empty label element (``).
## Adding constraints
Now say you want to make the title and author required data. You control this with the `` element in the XForms model. Add the following under `` after your instance:
```markup
```
Notice how, as you enter text in the title or author field, the field's background changes color to indicate that the field must be filled out.
The above requires some explanations:
* The `` element is used to assign so-called [*Model Item Properties*](https://www.w3.org/TR/2006/REC-xforms-20060314/slice6.html) (or *MIPs*) to XForms instance nodes (typically XML elements or attributes). Such properties include whether a field is required, read-only, or visible; whether the field has to satisfy a certain constraint or be of a particular type; and whether the field is a calculated value.
* Here we use the `required` attribute, which determines whether a field is, well, required, that is, whether it has to be filled out by the user.
* Much like `` in the controls, `` elements can be nested.
* `` uses a `ref` attribute, which allows pointing at more than one node using a single XPath expression.
* The outer `` element points to the `` element under the top-level `` element of your instance. This happens because the evaluation context for a top-level XPath expression in an `` element is the root element of the first XForms instance. You could be more explicit, for example with:
```markup
...
```
Or with:
```markup
...
```
The latter makes it clear, with the XForms `instance()` function, that you are addressing the `books-instance` instance and not another instance, so you will probably tend to prefer that notation.
* The inner `` elements apply the *required* MIP to the `` and `<author>` elements. The `required` attribute must contain an XPath expression, which is why it contains `true()` (the way to express a Boolean "true" value in XPath) and not simply `true`. Using XPath expressions allows you to make MIPs dynamically change, so that, for example, a form field can be required or not depending on other form fields.
* Note that MIPs are assigned to XML nodes, not directly to controls. But they affect the controls that are bound to those nodes. This is part of XForms's MVC philosophy.
## Single selection controls
XForms is of course not limited to simple input controls. Add the following after the second `<xf:input>` control:
```markup
<xf:select1 ref="language">
<xf:label>Language</xf:label>
<xf:item>
<xf:label>Choose one...</xf:label>
<xf:value/>
</xf:item>
<xf:item>
<xf:label>English</xf:label>
<xf:value>en</xf:value>
</xf:item>
<xf:item>
<xf:label>French</xf:label>
<xf:value>fr</xf:value>
</xf:item>
<xf:item>
<xf:label>Spanish</xf:label>
<xf:value>es</xf:value>
</xf:item>
</xf:select1>
```
Reload the page. You should see the following:
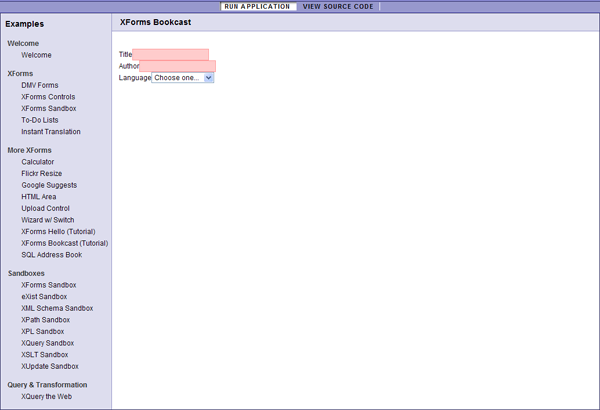
You have just added a single selection control with `<xf:select1>`. The name means that the user can "select one" item among several items. (XForms tends to call controls using more abstract terms, rather than giving them names such as "combo box" or "menu".) The single selection control usually appears like a drop-down menu or combo box with most XForms implementations (but you can change it's appearance as shown later).
Nested within the control, you find several `<xf:item>` elements. Each one creates an item in the drop-down menu. An item has two sides: the `<xf:label>` element specifies the *label* that is presented to the user, and the `<xf:value>` element specifies the *value* that is stored into the XForms instance when the user selects that particular item.
Now XForms encourages you to store data in the model. For a selection control, this means storing the list of labels and values in an XForms instance instead of statically listing the items under the `<xf:select1>` element. So let's do this! Create a new instance in the model:
```markup
<xf:instance id="languages-instance">
<languages xmlns="">
<language>
<name>English</name>
<value>en</value>
</language>
<language>
<name>French</name>
<value>fr</value>
</language>
<language>
<name>Spanish</name>
<value>es</value>
</language>
</languages>
</xf:instance>
```
Then modify the `<xf:select1>` element as follows:
```markup
<xf:select1 ref="language">
<xf:label>Language</xf:label>
<xf:item>
<xf:label>Choose One...</xf:label>
<xf:value/>
</xf:item>
<xf:itemset ref="instance('languages-instance')/language">
<xf:label ref="name"/>
<xf:value ref="value"/>
</xf:itemset>
</xf:select1>
```
Notice the new `<xf:itemset>` element in addition to the `<xf:item>` previously used. That element specifies an *item set*, which allows you to point to the list of `<language>` nodes in the `languages-instance` instance, and for each of those to tell the control where to find the label and the value.
You often don't have to use an item set, but using them gives you the flexibility of reusing existing sets of data, dynamically changing the list of items, easing localization, etc.
## Adding a text area
Now add yet another control, a text area:
```markup
<xf:textarea ref="notes" appearance="xxf:autosize">
<xf:label>Notes</xf:label>
</xf:textarea>
```
The `<xf:textarea>` element acts very much like the HTML `textarea` element. It makes sense to use it to allow entering more than one line of text.
Here there is a little trick: you use the `appearance` attribute to tell Orbeon Forms to use a particular appearance for the text area control. Instead of the standard text area, `appearance="xxf:autosize"` allows the text area to grow vertically as the user enters more text. (This is an appearance which is specific to Orbeon Forms, and you can tell that because of the `xxf:` prefix in the appearance value.)
Note that the application captures the same data without the `appearance` attribute, it's just that the control appears slightly differently and the user experience is changed.
## Finishing-up the controls
To create the ratings input, add this new instance:
```markup
<xf:instance id="ratings-instance">
<ratings xmlns="">
<rating>
<name>1</name>
<value>1</value>
</rating>
<rating>
<name>2</name>
<value>2</value>
</rating>
<rating>
<name>3</name>
<value>3</value>
</rating>
<rating>
<name>4</name>
<value>4</value>
</rating>
<rating>
<name>5</name>
<value>5</value>
</rating>
</ratings>
</xf:instance>
```
And then add another `<xf:select1>` control:
```markup
<xf:select1 ref="rating" appearance="full">
<xf:label>Rating</xf:label>
<xf:item>
<xf:label>None</xf:label>
<xf:value/>
</xf:item>
<xf:itemset ref="instance('ratings-instance')/rating">
<xf:label ref="name"/>
<xf:value ref="value"/>
</xf:itemset>
</xf:select1>
```
Here again, you store the list of items as a separate instance, but we keep the "empty" item as an `<xf:item>`. There is something new: the use of the `full` appearance, which displays the selection control as a list of radio buttons. This is a standard XForms appearance value, which is likely to be supported by all XForms implementations. (You can tell that it is standard because there is no colon `:` in the appearance value.)
The only missing control now is the input field bound to the `<link>` element. Add this, and you should have something like this in your controls:
```markup
<xf:group ref="book">
<xf:input ref="title">
<xf:label>Title</xf:label>
</xf:input>
<br/>
<xf:input ref="author">
<xf:label>Author</xf:label>
</xf:input>
<br/>
<xf:select1 ref="language">
<xf:label>Language</xf:label>
<xf:item>
<xf:label>Choose One...</xf:label>
<xf:value/>
</xf:item>
<xf:itemset ref="instance('languages-instance')/language">
<xf:label ref="name"/>
<xf:value ref="value"/>
</xf:itemset>
</xf:select1>
<br/>
<xf:input ref="link">
<xf:label>Link</xf:label>
</xf:input>
<br/>
<xf:select1 ref="rating" appearance="full">
<xf:label>Rating</xf:label>
<xf:item>
<xf:label>None</xf:label>
<xf:value/>
</xf:item>
<xf:itemset ref="instance('ratings-instance')/rating">
<xf:label ref="name"/>
<xf:value ref="value"/>
</xf:itemset>
</xf:select1>
<br/>
<xf:textarea ref="notes" appearance="xxf:autosize">
<xf:label>Notes</xf:label>
</xf:textarea>
</xf:group>
```
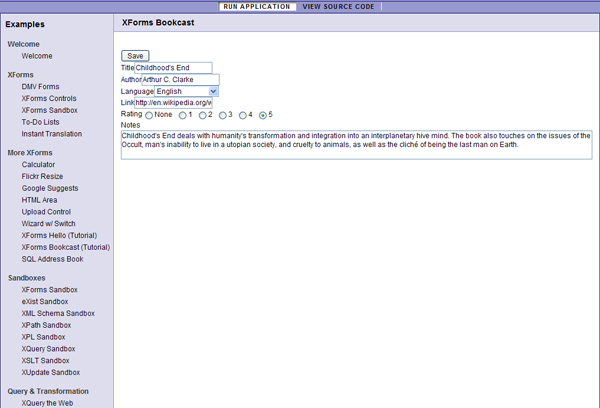
And this is how the result should look like (you will see how to add the Save button you see on this screenshot in the next section):
By now you probably get the gist of it!