Polishing the app
Making things look nicer
You are probably not very happy with the look of your application. But let's see how you can improve this with CSS.
First, start with a nicer "action bar" at the top of the page:
<table class="books-action-table">
    <tr>
        <td>
            <xf:submit submission="save-submission" appearance="minimal">
                <xf:label><img src="../apps/my-bookcast/images/save.gif" alt="Save"/> Save</xf:label>
            </xf:submit>
        </td>
        <td>
            <xf:submit submission="list-submission" appearance="minimal">
                <xf:label><img src="../apps/my-bookcast/images/recycle-green.png" alt="Revert"/> Revert</xf:label>
            </xf:submit>
        </td>
    </tr>
</table>
You notice that:
The triggers are also improved with the
minimalappearance, which renders the trigger as a hyperlink instead of a button.You put an HTML image (
<img>) element within the trigger's label. Yes, this is allowed and allows you to make a clickable icon!
Then encapsulate the main XForms controls within a table:
You notice a few more things:
<xf:repeat>is put around an XHTML<tr>element, which means that the repetition repeats table rows.You add class names on the table and on a table cell, in order to facilitate CSS styling.
Finally, add a books-label class to the controls related to book data, for example:
Now remember that Orbeon Forms does not send the XForms code directly to the web browser, but instead it transforms it into HTML. You realize that this is done because Orbeon Forms cannot assume your web browser to support XForms at all. Consider the following examples:
And so on for each XForms construct. You notice that Orbeon Forms produces HTML code, including HTML form elements. Ideally, you wouldn't have to know this, and often you don't, but when it comes to styling with CSS having an idea of what the resulting HTML looks like will help you a lot.
So now look at the following CSS declaration for the Bookcast application:
CSS
Description
.xforms-label { font-weight: bold }
Display all labels in bold.
.books-label { display: -moz-inline-box; display: inline-block; width: expression('9em'); min-width: 9em; }
Display all labels with the books-label class to have a minimum width. This allows aligning all the labels on the left. Note the mozilla- and IE-specific CSS.
.xforms-textarea-appearance-xxforms-autosize { width: 20em; margin-bottom: 2px }
Set width and margin to all text area controls with appearance xxf:autosize.
.xforms-input input { width: 20em; margin-bottom: 2px }
Set width and margin to all input controls.
.xforms-select1 { margin-bottom: 2px } .xforms-select1 input { margin-bottom: 2px }
Set margin to all single selection controls.
.books-table { background-color: #fce5b6 }
.books-table .add-td { width: 33em }
.books-table .form-td { width: 33em; background: white; padding: .5em }
Format the main table.
.xforms-repeat-selected-item-1 .form-td { background: #ffc }
Change the background color of the currently selected repeat index.
.books-action-table { margin-bottom: 1em }
.books-action-table td { white-space: nowrap; vertical-align: middle; padding-right: 1em }
.books-action-table .xforms-submit img { vertical-align: middle }
.books-action-table .xforms-trigger-appearance-minimal img { margin-right: 1em; vertical-align: middle }
Set margins and alignment for the action table at the top of the page.
Now just add all the CSS declaration under the page's <head> element, encapsulated within an HTML <style> element:
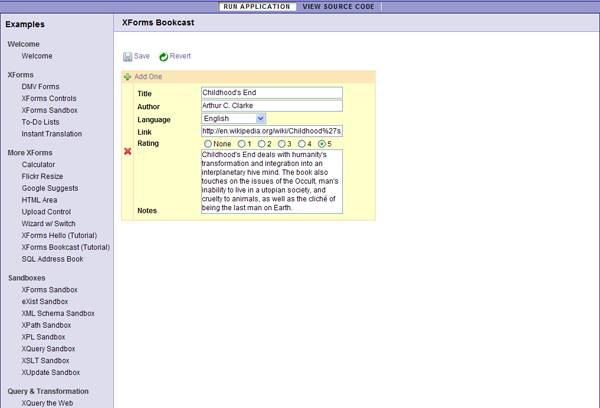
Reload the page, and you should see something like this:

A little bit of CSS does make things look a little better, doesn't it?
Adding validation
You already made the title and author mandatory fields, but you may want to validate the data more thoroughly. With XForms, validation has two sides:
A user-facing side, which tells the user which form fields are invalid. With Orbeon Forms, invalid fields are marked by default with an exclamation point icon. In the Bookcast application, you may want to make sure that the link field contains an HTTP URI with a correct syntax.
A hidden side, which prevents submission from happening if the data to submit is invalid. With the Bookcast application, for example, it is important to make sure that the data you store into the database follows a certain set of rules. This protects you against invalid data entered by the user, or against programming mistakes.
XForms supports two ways of performing validation:
With Model Item Properties (MIPs) in the model, called
constraintandtype.With an XML Schema. XML Schema is a W3C standard to specify constraints on XML documents, including constraints on the structure of the document or on the data types contained.
Look at the following XML Schema for the Bookcast application:
XML Schema requires some learning, but for now just consider the following:
This schema constrains the structure of the
books-instancedocument, i.e. it makes sure that the correct elements are encapsulated. If by mistake you create a<book>element under<books>, this error will be caught.This schema also checks the data types for the rating, language and link. If by mistake you allow a rating with value
6, the schema will catch this.A schema is rarely perfect! You can often work more on it and constrain your data in a better way.
Now create the schema as schema.xsd in the same directory as view.xhtml and page-flow.xml. Then link it to the XForms page as follows:
Alternatively, you can place the schema inline within the XForms model:
Also add <xf:alert> elements to the controls which might be invalid. This allows you to specify a meaningful validation message:
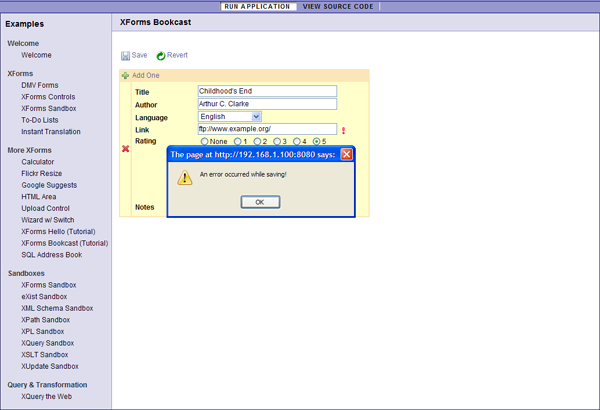
Reload the page, and try to enter an invalid link, for example "ftp://ftp.example.com/". An alert icon will show up as you leave the link field with your cursor.
NOTE: The URL of the schema, /apps/my-bookcast/schema.xsd, is resolved relatively to the external URL of the Bookcast page, so the schema is actually loaded through:
Because retrieving documents through HTTP takes some time, you can also use the Orbeon Forms protocol, oxf:, to load the schema:
This protocol allows loading files stored as Orbeon Forms resources.
Still with an invalid link, press the "Save" link and check the data in the database. Notice that the invalid data didn't save! This happens because the XForms engine automatically ensures that the data sent by a submission is valid before going on with the actual submission.
It would be nice to tell the user that saving didn't work. You can do this very easily: if a submission error occurs, the <xf:submission> element dispaches the xforms-submit-error event. So let's see how you catch that event and display a message to the user:
The <xf:submission> element hasn't changed, except we added a nested <xf:message> element. Besides the event attribute, which you start to be familiar with, this element takes a level attribute (use "modal" in general for alerts) and a message for the user.
Try now making this change, enter an invalid link, and press the "Save" link: an alert message should show up!
