> For the complete documentation index, see [llms.txt](https://doc.orbeon.com/llms.txt). Markdown versions of documentation pages are available by appending `.md` to page URLs; this page is available as [Markdown](https://doc.orbeon.com/xforms/xforms-tutorial/bookcast/database.md).
# Database access
## Adding a "save" button
The Bookcast application now allows you to capture some data. But it is not a very useful application yet, because it doesn't do anything with it! So let's see how you can add a "Save" button that, once pressed, well, saves the data in your form.
Many applications use relational databases as a persistence layer. But because Orbeon Forms and XForms use XML as their native data format, it is very appropriate to use a database that understands XML instead. Orbeon Forms comes with the open source [eXist database](http://exist.sourceforge.net/) that does just that.
So how do you save data from XForms to a database? An important feature of XForms is the XForms *submission*. A submission allows you to read and write XML documents using HTTP and other protocols. Because the eXist database has a REST API (in other words an HTTP-friendly interface), XForms can directly talk to eXist to read and write XML documents and perform all the common CRUD (Create, Retrieve, Update and Delete) operations.
So look at how you create a submission that saves the `books-instance` instance into eXist:
```markup
```
Let's look at the details:
* The `` element declares a submission.
* As usual, the `id` attribute allows referring to the submission from other XForms constructs.
* The `ref` attribute specifies what piece of XML must be handled by the submission. It points to an instance node with an XPath expression. Here, we point to the whole `books-instance` instance by using the `instance()` function.
* The `resource` attribute specifies to what URL the submission takes place. Here, you use an absolute path:
```markup
/exist/rest/db/orbeon/my-bookcast/books.xml
```
This path is equivalent to using the absolute URL:
```markup
http://localhost:8080/orbeon/exist/rest/db/orbeon/my-bookcast/books.xml
```
(Because it is inconvenient for you to always write absolute URLs when you want to address an URL handle by Orbeon Forms, Orbeon Forms automatically resolves absolute paths against the base `http://localhost:8080/orbeon/`.)
The path starts with `/exist/rest/`, which maps to the built-in eXist database. The rest of the path (`/db/orbeon/my-bookcast/books.xml`) specifies the *collection* and *document* to access. Here, we decide to save the data to a document called `books` within a collection called `/db/orbeon/my-bookcast/`.
* The `method` attribute specifies what HTTP method to use. Here, you use the value `put`, which translates into using the HTTP `PUT` method. (You may not be very familiar with the `PUT` method (HTML forms, for example, always use `GET` and `POST`), but `PUT` is getting used more and more with REST interfaces. In just a few words, `PUT` allows you to store a resource to a particular location on an HTTP server.)
* Finally, the `replace` attribute specifies what to do with the response sent by the server (here the server is the eXist database). Specifying a value of `none` tells the XForms engine to discard the content of the response from the database.
This is great, but specifying a submission does not do anything until you *send* (execute) that submission. A simple way to do this is to use the submit control:
```markup
Save
```
This control has a `submission` attribute which specifies what submission to send. The control typically looks like a push button, into which the specified label appears. Pressing it automatically sends the submission specified.
So go ahead and:
* Add the submit control just before the `` element.
* Add the submission to the model.
* Reload the page.
* Enter a book title and an author, then press the "Save" button. Your form data has been silently saved to the database. It was that easy!
* Then, let's check that the data is actually in the database. By default, for security reasons, eXist is setup so you can't directly access it from your browser. However, it is often convenient to do so while in development. For this, comment out the following lines in your `orbeon/WEB-INF/web.xml` noting that you will need to remove the comment after `` to make it well formed XML. (and don't forget to put them back before going to production if necessary):
```markup
orbeon-exist-filter/exist/*Security filter for eXistREQUESTFORWARD
```
Then, open up a new browser tab or window, and enter the following URL:
```markup
http://localhost:8080/orbeon/exist/rest/db/orbeon/my-bookcast/books.xml
```
This is the exact same URL to which your submission has done an HTTP `PUT`. By entering it in your browser, you tell it to do an HTTP `GET` instead, and the eXist database simply sends the XML document to your browser. You should see this:
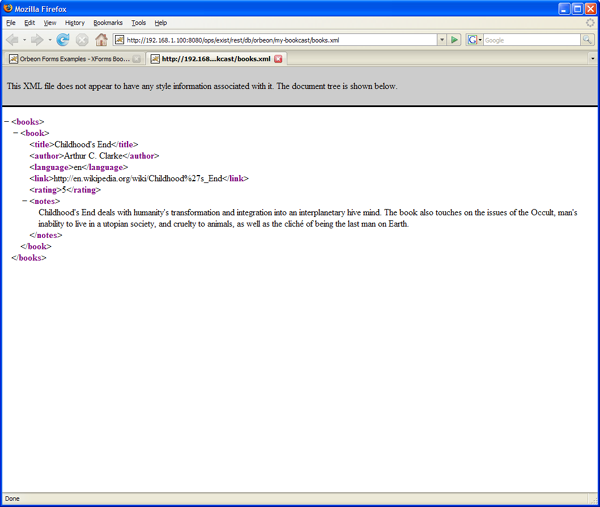
Try changing the book author and pressing "Save" again. Then in your other browser tab or window, reload the eXist URL, and notice that the data has actually changed in the database.
Do you see how persistence is easily implemented with Orbeon Forms? No need for object-relational mapping or for manually marshalling data to and from a database: just send and retrieve XML documents representing your form data!
*NOTE:*
*Of course, you don't have to use eXist or even an XML database with Orbeon Forms: you can in fact interface with any system you can think of with submissions. For systems that don't already have a REST API, you will need to write REST interfaces - and you can do this with your favorite language and platform, including Java, PHP, Ruby, or .NET. You can even write such services with Orbeon Forms XPL (the Orbeon Forms XML pipelines language), which feature built-in components for access to relational databases, web services, and more.*
## Loading the initial data
You can now save your data to the database, and read it back using your web browser. The missing part of course consists in allowing the application to automatically load up the data when the page is first displayed.
You guessed it, one way of doing this is to use a submission:
```markup
```
There are a few differences with this ``:
* The `id` attribute is different: `list-submission`. (All the `id` attributes in a given XForms document must be different.)
* The `serialization="none"` attribute specifies that you don't want to send XML data with this submission.
* The `get` method specifies that you want to do an HTTP `GET`, like when you pointed your web browser at the URL to read the document from eXist.
* The `replace="instance"` attribute specifies that the result of the submission has to be stored into an instance. The `instance="books-instance"` attribute specifies the identifier of the instance into which the result must be stored.
Add this element after the previous `` element which has an id value of `save-submission,`i.e. one submission follows the other.
Like with the ` having an id of `save-submission`, the submission needs to be sent to achieve something. You do this by adding the following *event handler* to the model, just before the end of the model:
```markup
```
Hence the code now has the appearance of
```markup
```
This tells the XForms engine to execute an *action* called `` when the XForms engine is ready. This action takes an attribute called `submission`, which specifies which submission to send, here `list-submission`.
Note the special attribute called `event`: this attributes marks the `` element as an *event handler*, that is an action that must respond to an event dispatched by the XForms engine. In this case, the name of the event is `xforms-ready`, which is a standard XForms event with the meaning that well, the XForms engine is ready.
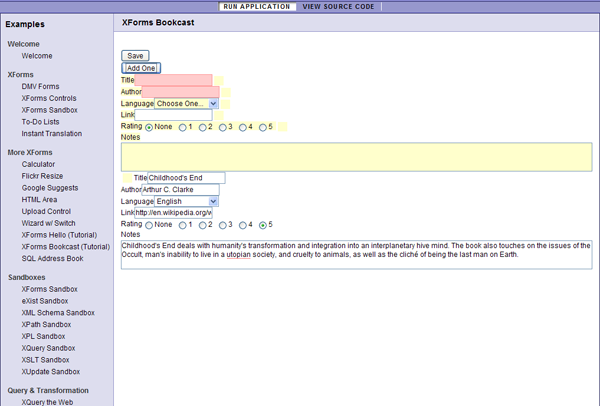
After adding the event handler, reload the page, and notice how the page now loads and immediately shows the data that you saved into the database.
The following is an overview of what has just happened:
* You request the page of the Bookcast application with your browser.
* Orbeon Forms receives the request, looks up the page flow file, and finds out that `view.xhtml` must be served.
* `view.xhtml` goes through the XForms engine, which does a few bits of magic: it goes through an initialization phase, where it creates the objects you have defined such as as model, instance, and controls.
* Once this is done, the XForms engine sends the `xforms-ready` event to the model.
* Because you have defined an event handler for `xforms-ready`, that handler is called. This caused the `` action to be run and, therefore, the `list-submission` submission to be sent.
* The submission performs an HTTP `GET` to the URL you have specified. The connection reaches the built-in eXist database, which returns the document called `books.xml`. The content of that document reaches back the XForms engine, which stores it into the `books-instance` instance.
* The XForms engine updates the XForms controls bound to the instance with the values now contained in the instance. For example, the "title" and "author" input fields are now updated with the values that came from the database.
* The XForms engine sends an HTML page to your web browser. You see the page with all the correct data as saved earlier into the database.
*Actions* and *events* are very important in XForms: they are the glue that allows you to react to different "things" that happen in an XForms page, whether controlled by the XForms engine or directly by the user. This is very similar to using JavaScript in a regular HTML page. In XForms, they allow you to react to the user pressing a button, entering data, etc. XForms comes with a number of standard events and configurable action that you can combine in many ways, so that in most cases you don't need to use something like JavaScript.
(You may wonder what would happen the first time the `list-submission` is called if no `books.xml` document is available in the database. The answer is that the database would return an error, and the submission would throw an event called `xforms-submit-error`. But because you don't have an event handler for this event, nothing happens: the initial content of the `books-submission` instance is not changed and so you see an empty form.)
## Adding more books
Now let's see how we can enter information about more than a single book!
XForms comes with a really handy construct called ``. This allows you to *repeat* sections of user interface controls, based on instance data. To see how this works, first replace the group you have defined:
```markup
...
```
with, instead, this:
```markup
...
```
Reload the page, and notice that, well, nothing changes so far!
This tells the XForms engine that the content of the `` element must be *repeated* as many times as `` elements are found in the instance. If you have a single `` element, then the controls are not repeated (which is equivalent to having ``); if you have two `` elements, they are repeated two times, etc.
The trick now is to manage to *add* a new `` element to the `books-instance` instance. First, create a *template* for the new `` element to insert by declaring a new instance:
```markup
```
Then you want to copy that template to the right place in `books-instance` when the user presses a button. You do this with a new control called `` and a new action called ``. Add the following to your controls:
```markup
Add One
```
Insert this immediately before the `` .
Let's explain what the above does:
* The `` element declares a button (remember, XForms likes more abstract names, but this control could have as well been called ``). Like all XForms controls, `` takes a label, which is here displayed within the button.
* Once the user presses it, the button sends an event called `DOMActivate`. Don't be scared by this funny name, you will use it all the time. It just means that the user has *activated* the button, which in most cases means that the user pressed (clicked) on it.
* `` is declared as an event handler with the `event="DOMActivate"` attribute, so this action runs when the user presses the button.
* Here we have decided that we want to insert a new book always in first position in the page. The trick is to configure the insert action with the appropriate attributes.
With the configuration provided, the action *inserts* (``) the contents of the `book-template` instance (origin="instance('book-template')") *before* (`position="before"`) the *first* (`at="1"`) element called `` (`ref="book"`) under the `books-instance` instance's root element (`context="instance('books-instance')"`).
This may sound a little confusing at first, but that's because `` is in fact very powerful and you can combine its attributes in many different ways.
Make the changes above, press on the "Add One" button, and you see a new row of controls created.
Again the XForms engine does its magic and takes care of updating the web page automatically. You also notice that the web page does not reload as it updates. This is because Orbeon Forms uses Ajax technology to perform updates to the page. With Ajax, client-side JavaScript code silently talks to the Orbeon Forms server, which then communicates to the client-side code the updates to perform to the page. These updates are directly done to the HTML Document Object Model (DOM) without reload.
## Deleting a book
If you can add books, you probably also want to be able to remove them. This can be done with the `` action. It doesn't seem to make much sense to always remove the first book, but rather, you probably want to delete a specific book. This can be done in several ways, but what about adding a delete button next to each series of repeated controls:
```markup
Remove
```
This works in a way very similar to the "Add One" button:
* The `` element declares a button, but here with a different label ("Remove"). Once the user presses it, the button sends a `DOMActivate`.
* `` is declared as an event handler with the `event="DOMActivate"` attribute.
* The difference is in the configuration of ``.
Here you don't use the `position` and `origin` attributes. What you are telling the action here is to delete (``) the element called `` (`ref="book"`) under the `books-instance` instance's root element (`context="instance('books-instance')"`) which is at the current index position of the `book-repeat` repetition (`at="index('book-repeat')"`).
To understand the `index()` function, you should know that each repetition in XForms has an associated *current index*, which tells you which current iteration of a repetition is currently active. The current index changes as you navigate through controls. If you type in the title input field of the first book, the index is `1`; if you type in the author input field of the third book, the index is `3`; and so on. The index changes also if you click buttons. Usually, the current index is also visually highlighted.
So here, when you click on the "Remove" button of, say, the second book, the index for the `books-repeat` repetition changes to `2`, and therefore `index('books-repeat')` also returns `2`. This way, you can tell `` to remove the second `` element.
Now add the new trigger within `` and reload the page. Try adding books, then removing them by pressing the "Remove" button.

## Adding a "revert" button
For fun, let's also add a new button to cancel your unsaved edits and reload the original data from the database. It's as easy as this:
```markup
Revert
```
When you press the "Revert" button, the `list-submission` submission is called, which causes the latest saved `books.xml` document to be reloaded. The XForms engine makes sure that all the controls on the page, including repeats, automatically update to reflect the changes to the `books-instance` instance.