The Hello application
Running the Hello application
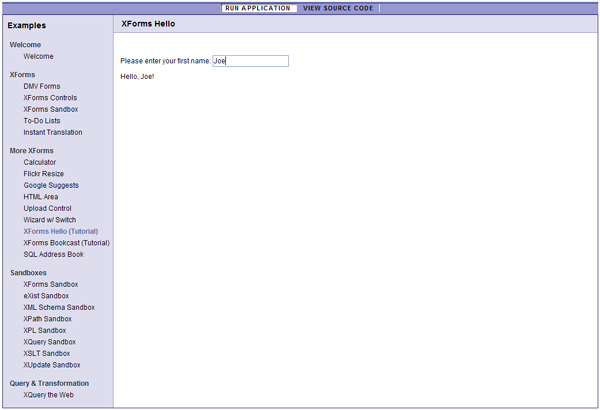
The Hello application is about the simplest Orbeon Forms application you can think of. It asks for your name and displays it back. Here is a direct link for running XForms Hello online on the Orbeon website.
Simply enter your first name in the input field, for example "Joe". You should promptly see a message underneath saying "Hello, Joe!".

view.xhtml: this is the XHTML and XForms code for the Hello application.page-flow.xml: this is the page flow for the Hello application. The main task of a page flow is mapping external URLs (as typed in a web browser) to Orbeon Forms pages.
The source code
You are now ready to look at the source code of the Hello application. This will give you an idea of what an Orbeon Forms application looks like. First, select view.xhtml to make the source code for that file appear on the right:
The first thing you notice is that this looks very much like HTML (notice the <html> tag). But in fact, this is XHTML, the XML-compatible version of HTML. There are only a few differences that matter between HTML and XHTML, in particular you must close all your tags and use quotes around attributes. Also, you must place your tags in a namespace, which is why the <html> tag features the xmlns="http://www.w3.org/1999/xhtml" namespace declaration.
Another difference with plain HTML is that there are tags that start with the string xf:. Those are defined by the XForms specification from W3C. They are at the heart of Orbeon Forms and enable all the cool forms features that you see in Orbeon Forms demos. (In order to use XForms tags that start with xf:, you must add another namespace declaration on the <html> tag: xmlns:xf="http://www.w3.org/2002/xforms".)
Using XForms in Orbeon Forms means that you don't have to use HTML forms at all. The benefit is that XForms is much more powerful than HTML forms, as you will see in this tutorial.
You notice a tag called <xf:model>. Because XForms follows a Model-View-Controller (MVC) approach, most XForms pages contain one or more models that usually encapsulate other XForms markup. You place these models under the XHTML <head> tag.
Note that from now on, we prefer the term element to the term tag. An element is an XML term that includes the start tag and end tag, and can have content such as other elements and text.
With XForms, you store the data captured by controls such as input fields, combo boxes, etc. as text contained within XML elements or attributes. Consider the following XML document containing a single element called first-name.
The first-name element is empty. Contrast with:
The element now contains the string "Joe". Notice how in view.xhtml the XML document is encapsulated within an <xf:instance> element:
Also notice the special xmlns="" namespace attribute on <first-name>: this is necessary because the root element of the XHTML document defines a default namespace with xmlns="http://www.w3.org/1999/xhtml". Because we want to make it clear that the element <first-name> is not an XHTML element, but an element in no namespace, we add xmlns="" to that element. If your instance document must be in no particular namespace, you are always safe to add xmlns="" on the root element of that instance.
This element defines an XForms instance, which is just XForms' way of calling an XML document used to store data.
Now consider the remaining XForms elements in the source file: <xf:input> and <xf:output>. These two elements are not located under the XHTML <head>, but under <body>. They are part of the view of your page, in other words these elements directly help define visible controls on the page. Consider <xf:input>:
You guessed that this element allows the user to input information. <xf:input> is usually displayed to the user as an input field. The ref attribute is the magic that connects the input field to the XForms instance. It contains an XPath expression, which in this case just looks like a file path. In this case, /first-name points to the element called first-name, which happens to be the only element we have in the XForms instance. Using the ref attribute this way is called a binding and means two things:
When the user enters text in the input field, the text is saved into the element called
first-name.It also goes the other way: if somehow the text content of
first-namein the XForms instance changes, this is automatically reflected in the input field.
Now consider <xf:output>. As you guess from the name of the element, this simply displays a value on screen. If you have tried running the Hello application, you have probably guessed the logic that is being implemented: if the first name entered by the user is not a blank string, then we display the "Hello" message followed by the first name and then an exclamation mark. Otherwise if the first name consists only of spaces, we just display a blank string. The idea is to avoid displaying things like "Hello !" without an actual first name.
With many client-side libraries, you express this type of logic with JavaScript. With XForms, you use XPath instead. This means that you need to learn at least a few bits of the XPath syntax. While XPath may be different from what you already know (it is based on expressions and definitely targeted at XML), it is in fact a smaller language than JavaScript.
So how do you hook-up the logic within <xf:output>? Here, instead of a ref attribute, we use a value attribute. Like ref, value takes an XPath expression, but it doesn't actually create a binding to instance data: it just returns a string. The XPath is as follows:
A few things to point out:
The main expression has the form
if () then ... else .... (This is actually an XPath 2.0 expression, which supports theifconstruct.)The
normalize-space()function removes all leading and trailing space (and simplifies internal spaces as well). This is a little trick to not only test whether the first name is empty, but also to test whether it is an all-blank string.Contrary to JavaScript, the equality test is expressed with a single
=instead of==.The
concatfunction concatenates all its parameters into a resulting string. It is like the JavaScript+operator on strings.Note the use of the single quote
'around strings. This is needed because the XPath expression is put within double quotes"in thevalueattribute.
Page Flow
If you look at your browser's URL bar when showing the example, you notice that it looks like this:
The first part of the URL,
http://localhost:8080/, is self-explanatory: it depends on what host and port your server is running.The next part,
orbeon, depends on what context you install Orbeon Forms into. By default, because the WAR file is calledorbeon.war, the context isorbeon. (You could as well configure your container to use a different context, or an empty (default) context.)The last part,
/xforms-hello/, automatically matches the name of the directory you store your application into (more on this later when you look at the source code). This causes the application's page flow (page-flow.xml) to run.
So now look at page-flow.xml for the Hello application. It is very simple:
The important line in this page flow is this one:
It tells Orbeon Forms that any path (notice the wildcard *) sent by the web browser to this application causes the page view stored in view.xhtml to be processed. You can check this by entering the following path in your browser:
The exact same result shows! Of course, page flows make the most sense when you have more than one page in your application, which translates into more than one <page> element.
Orbeon Forms resources
Under TOMCAT_HOME/webapps/orbeon, you find a WEB-INF directory. That directory, in turn, contains a resources directory. We refer to that resources directory as RESOURCES below.
The RESOURCES directory is very important: this is where your application lives. This directory is called "resources" because it contains all the files (or resources) such as XHTML documents, XML schemas, images, CSS, etc. needed by your Orbeon Forms application.
NOTE: Orbeon Forms supports storing your resources pretty much anywhere you want. For convenience, by default they are available under the WAR file's WEB-INF/resources so you can get up and running without configuration.
A look into the resources directory structure
Under RESOURCES, you see the following files and directories:
appsdirectory: contains one sub-directory for each application currently running in Orbeon Forms. By default, it contains a series of sample applications - the ones that you see on the left side of your screen when you start Orbeon Forms. Notice a directory calledxforms-hello: this is the directory that contains the Hello application.configdirectory: contains several configuration files that you can modify if needed. For now, you don't need to worry about this directory.page-flow.xmlfile: the top-level page flow file. You should not worry about this file just yet. Just know that by default, it is in charge of deciding which application to run depending on the application name in the URL that you enter in your web browser.apps-list.xmlfile: contains the list of sample applications to display on the left side of the screen. This is not needed by your own application.
Playing with the hello application source code
You find the application under RESOURCES/apps/xforms-hello. That directory contains the two files that you have seen earlier through the Source Code Viewer in your web browser. Again, the name xforms-hello is important and matches the xforms-hello part of the URL in your web browser: http://localhost:8080/orbeon/xforms-hello/.
NOTE: In this tutorial, you will often have to "reload" pages in your web browser to see the effects of your changes to XHTML or XForms markup. Because of the way Orbeon Forms handles page reloads with XForms, for consistent results we recommend that you don't simply use your browser's reload button, but instead use one of the following two ways to reload a page:
Position your text cursor on your browser's URL bar and press the "Enter" key. Browsers often have keyboard shortcuts such as
CTRL-LorCMD-Lto reach the URL bar.Use your browser's "force reload" feature. This is often enabled by pressing the
SHIFTkey and pressing the "reload" button at the same time. Browsers often have keyboard shortcuts such asCTRL-F5,CTRL-SHIFT-R, orCMD-SHIFT-Rto perform this operation.
Now, modify view.xhtml:
Open
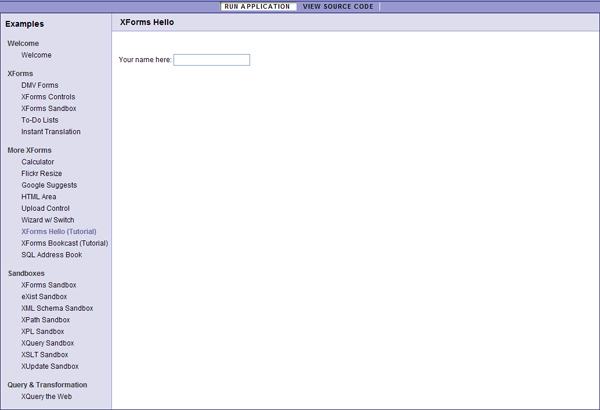
view.xhtmlin a text editor.Modify the string "Please enter your first name:" with "Your name here:".
Save
view.xhtml.Go back to the Hello application in your web browser and reload the page. You should see the new text appear:

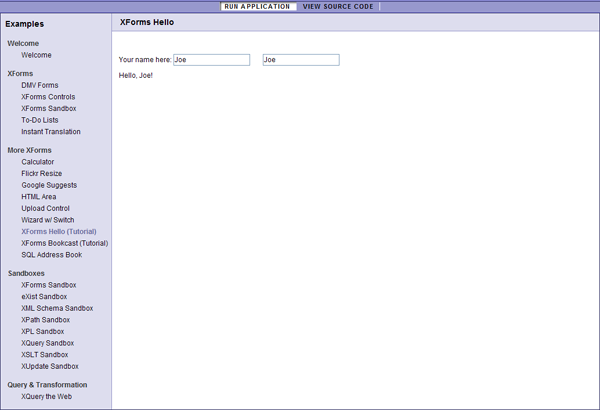
Repeat the experience but add some XForms. For example, add a second
<xf:input>right after the first one:
Reload the page, and notice, as you type in an input field, how the other one updates as you type. This happens because the two fields are bound to the same instance data. The incremental="true" attribute allows the changes to occur as you type, instead of occurring when you focus in and out of fields:

You notice that you get instant gratification with Orbeon forms: just change files on disk, reload your page, and your changes are taken into account with no compilation or other complex deployment.
Last updated